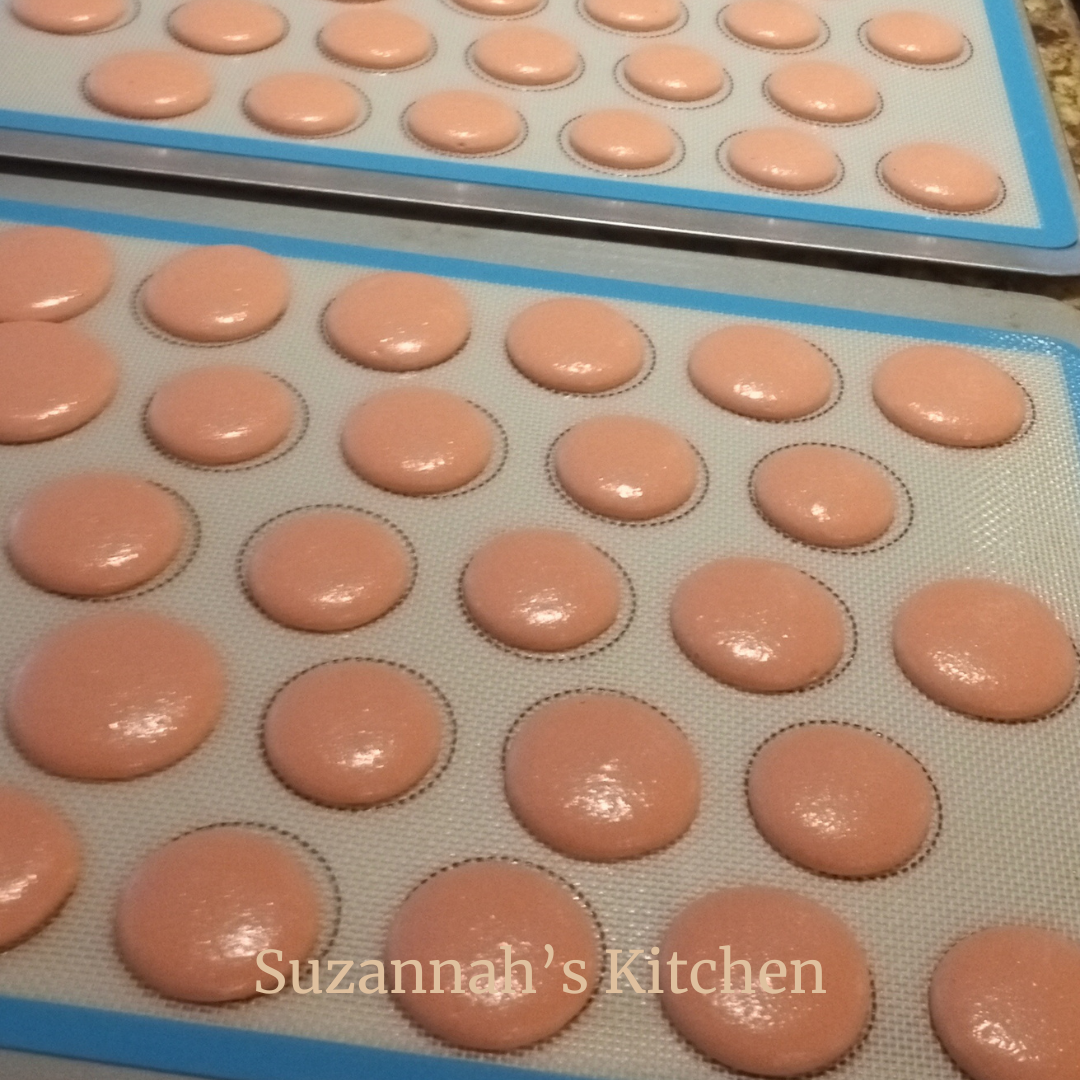
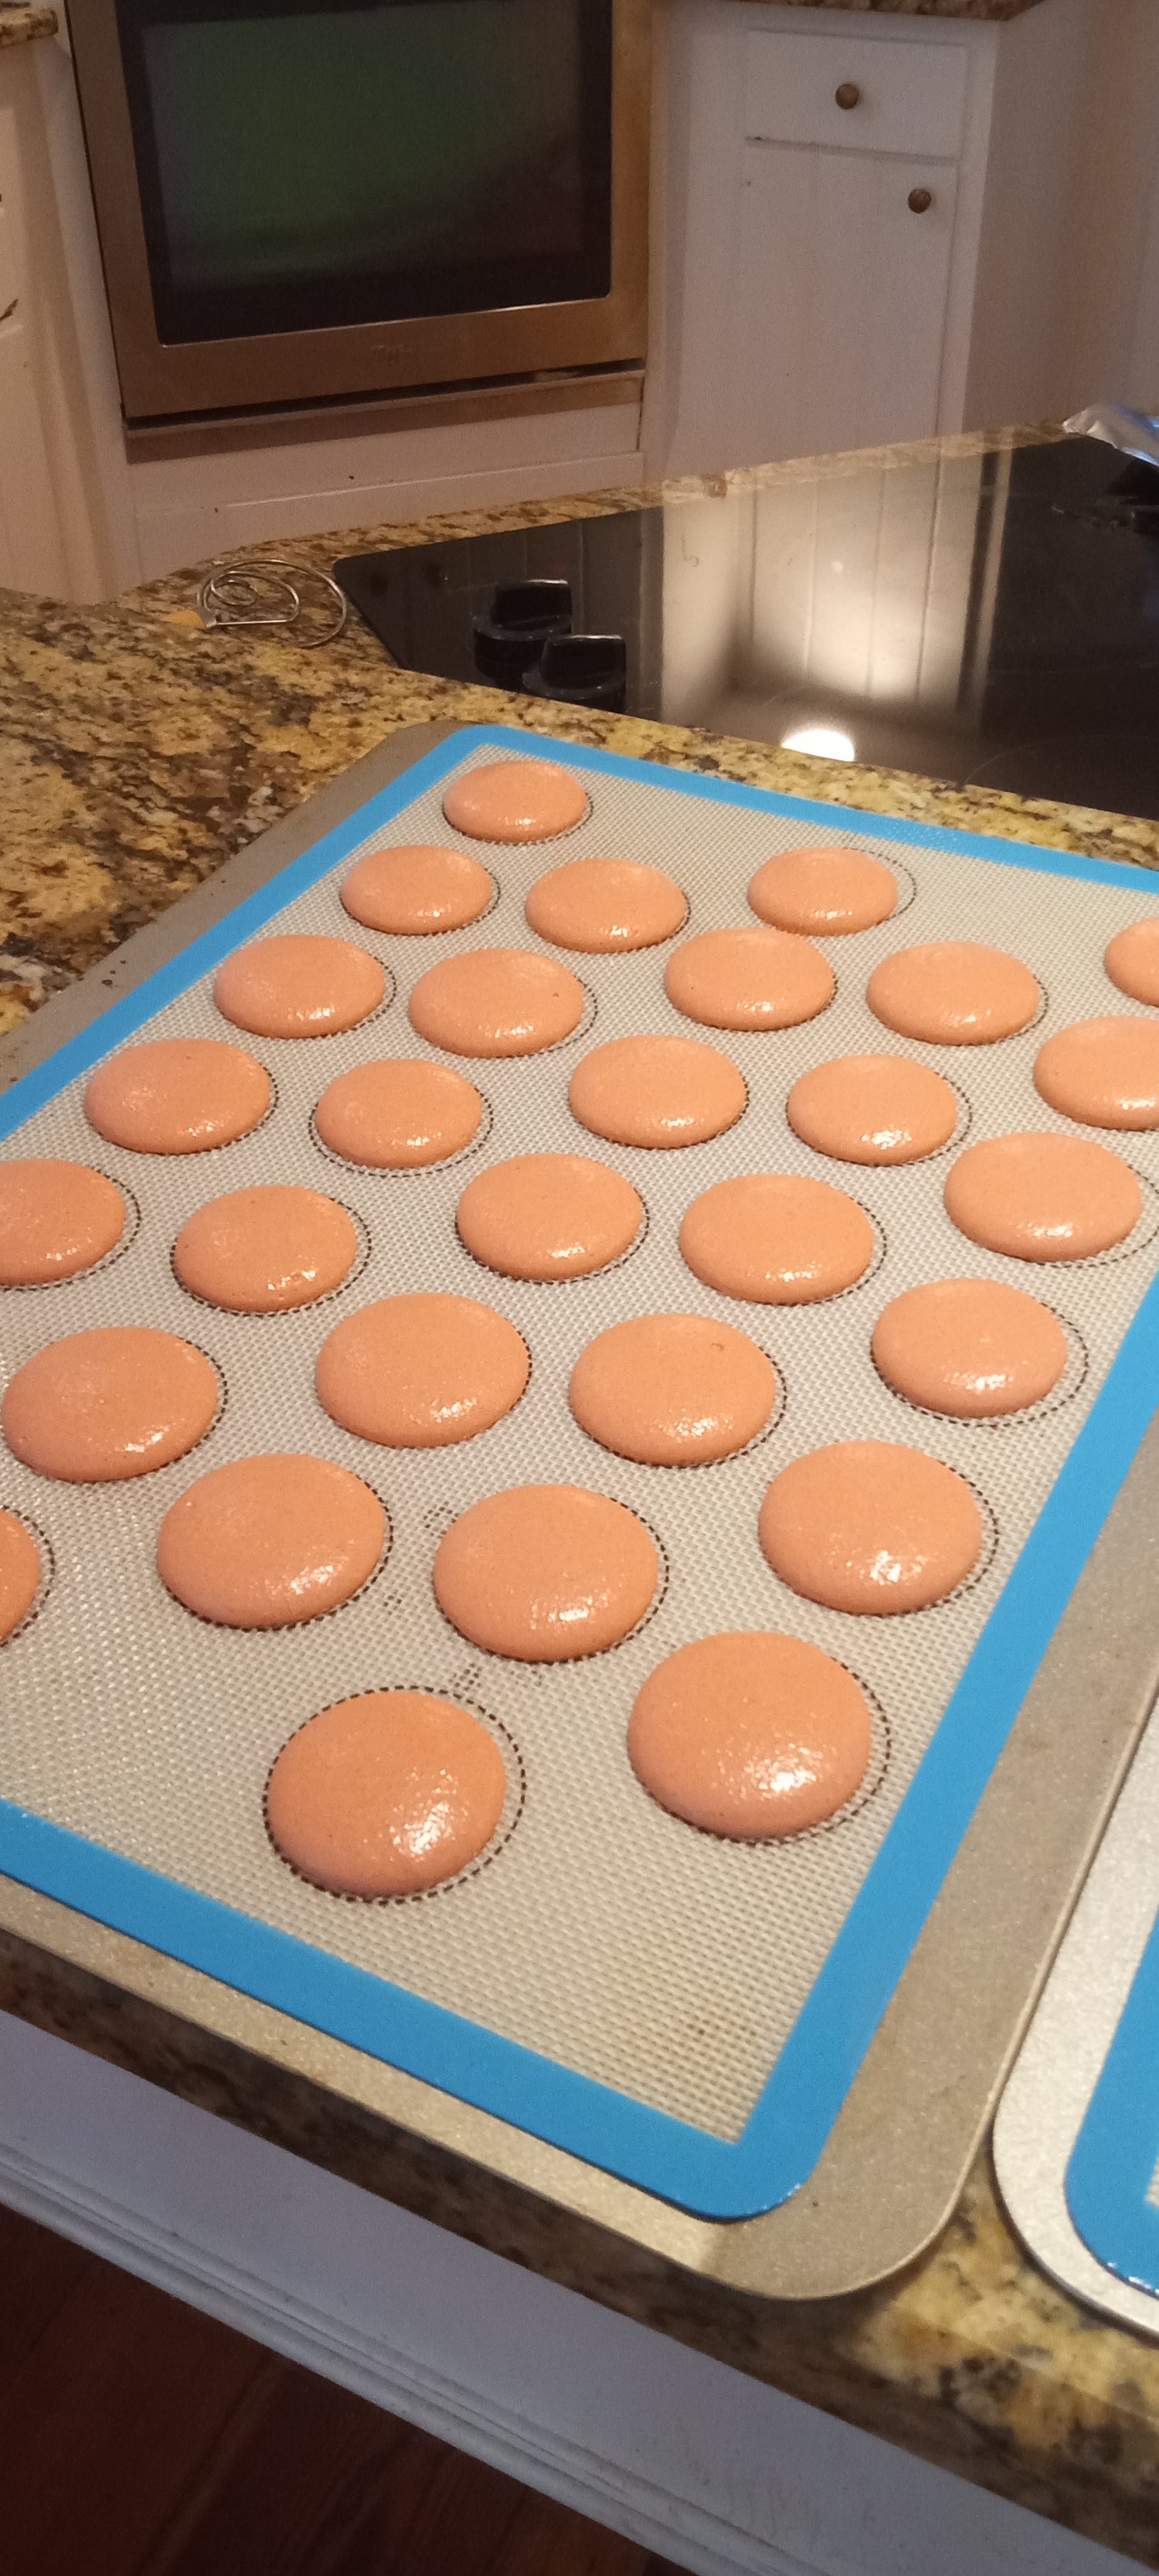
Macarons

How to Make Macarons

A properly crafted and baked macaron shell is like a sweet cloud. It is so light and airy with a frailness that crisps and practically melts in your mouth.

Printable PDF
  • When it comes to macarons, there are two parts: the macaron shells and the filling. There are many, many fillings you can make, but we’ll cover that in other recipes. The shells are the part that gives up all grief.

    I think one of the most important things to remember is these little devil are so very finicky They react (poorly) to temperature, air movement, humidity, handling, and unsteady oven temperatures as well as too hot or too cold, in a few seconds too long or not enough. They are all little baby bears - everything has to be just right.

    Given the pickiness and given that every kitchen, environment, cook, and oven is different you are going to have to do some testing to find out what works best for you, your kitchen, your oven.

    Also, if you are new at this it will take some time to learn the feel of the right consistency of meringue and macaron batter.

  • Prep Time:

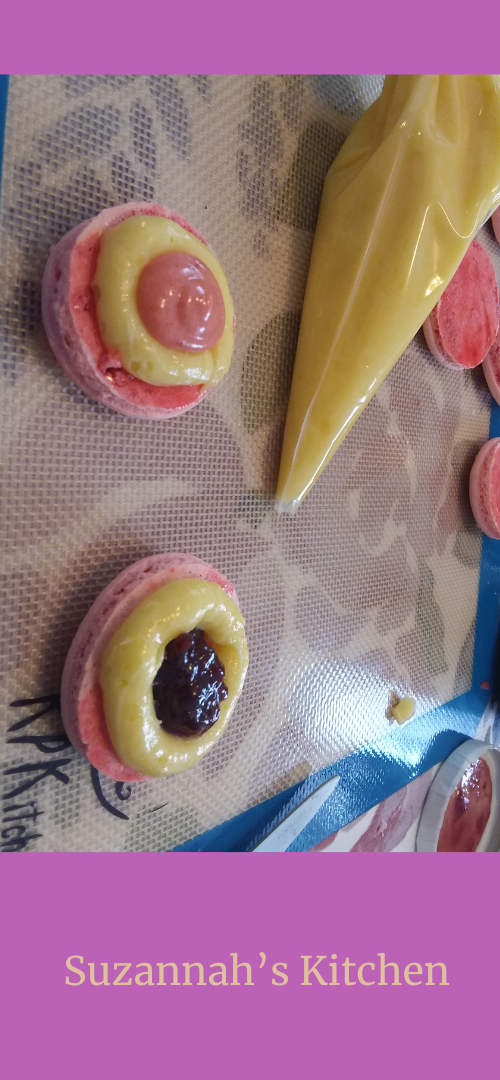
    Syrup 10-15 minutes | Meringue 10 minutes | Dry Mixture 5 minutes | Macaronage 10 minutes | Piping 10 minutes | Filling 10 minutes

  • Bake Time:

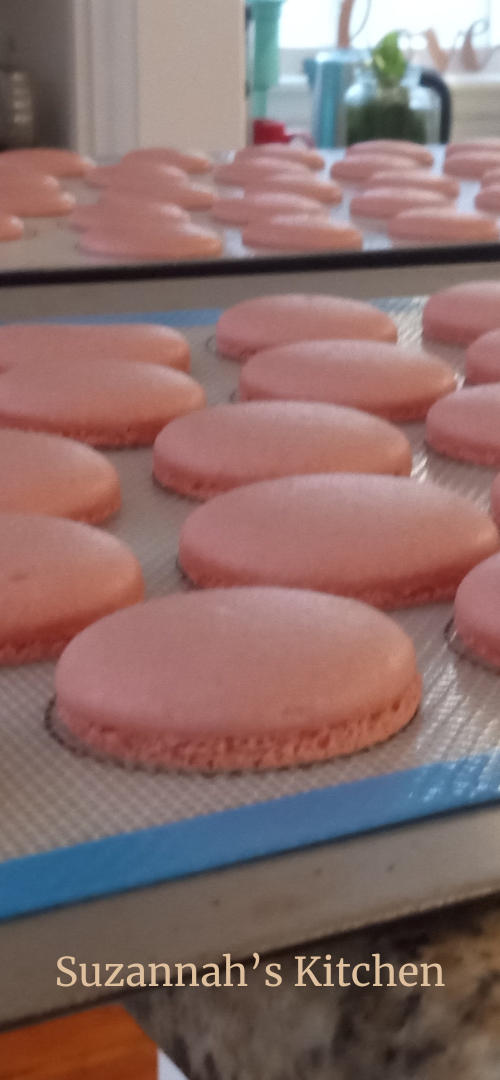
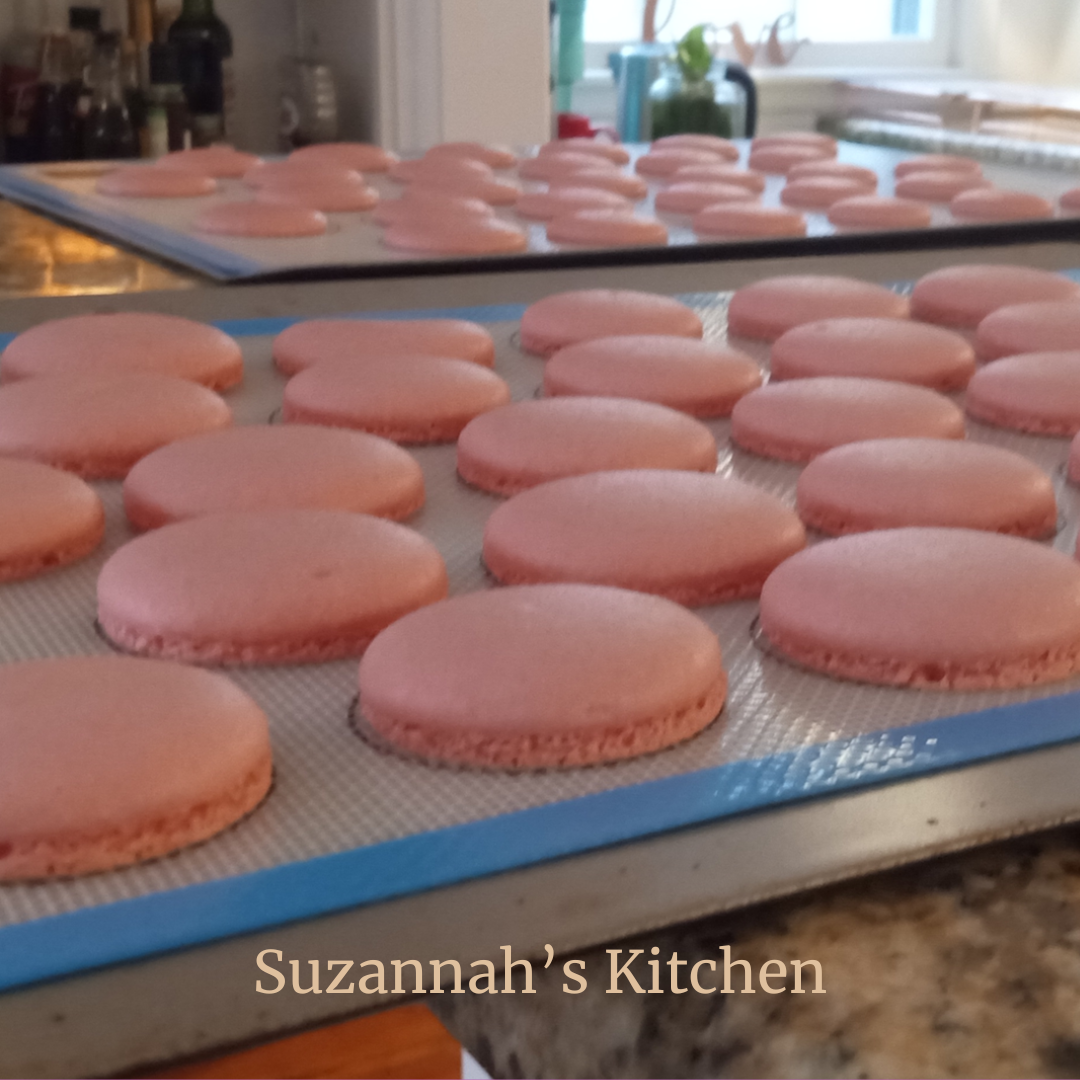
    Macarons 12-15 minutes/pan

  • Chill/Set Time:

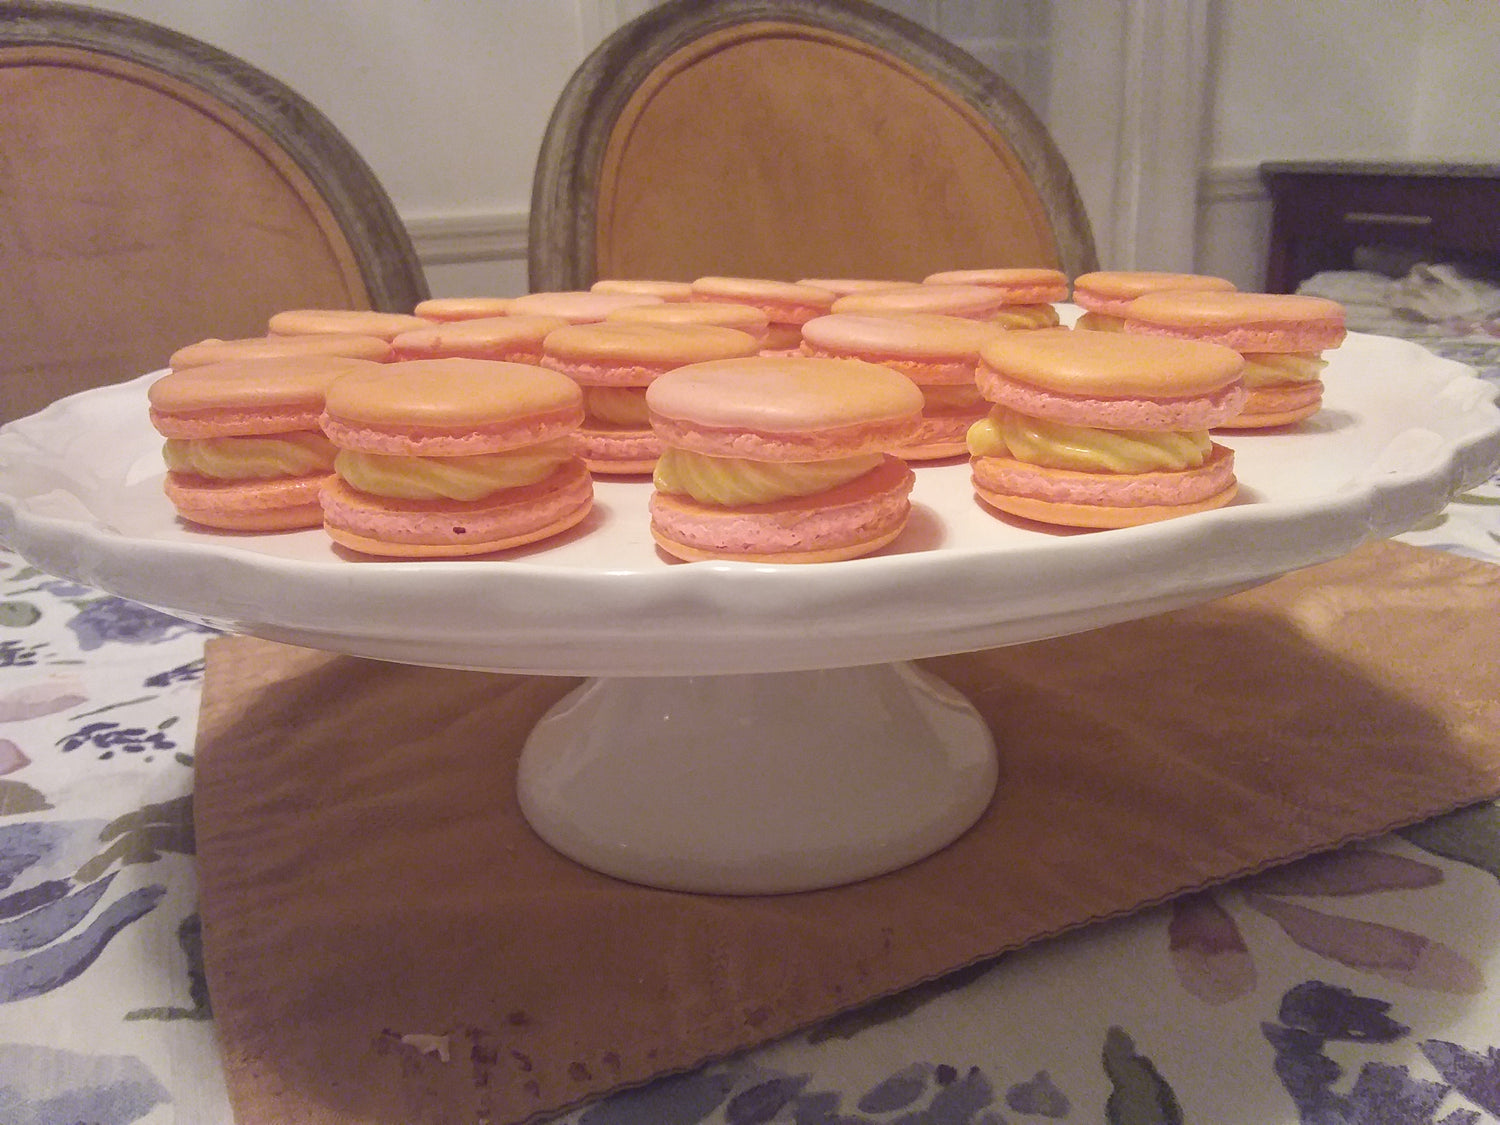
    2 hrs dry egg whites | 30 min dry shells | 30 min cool shells | 2-4hrs chill shells | 2-4 hrs chill filled macarons | 8 hours
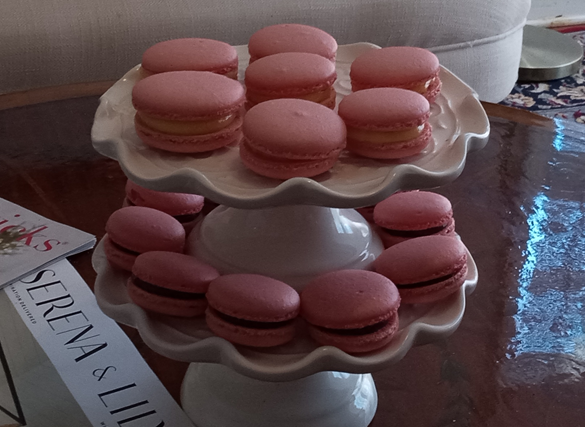
  • Servings:

    42

  • Materials:

    • Stand Mixer with Whisk
    • Hand Whisk
    • Fine, medium, & coarse mesh sieves/sifters
    • 2 Mixing Bowls
    • 1 Melting Pot for Syrup
    • Candy Thermometer
    • Aluminum Foil
    • Baking Sheets with silicone macaron mats
    • Piping bag with tips & cups
    • Spatulas
    • Piping Bag(s)
    • Round 0.25″ or 0.5″ piping tip (Wilton #12 is ¼”)
    • Tall cup(s) for piping bag(s)
    • Large Silicone Spatulas
    • Kitchen Scale
  • Prep:

    • Dried Egg Whites
    • Preheat Oven
    • Sift Flour
    • Whisk Dry Ingredients Together
    • Prepare boiling water
    • Warm the mixing bowls & utensils
    • Lay out silicone macaron mats on baking sheets with prepared piping bags and spatula on the side.
    • Prepare the piping bag(s). Apply the tip and coupler. Twist the bag just above the tip coupler the bend the end, tip up and stand the bag up in a large cup or canister and fold the edges of the bag over the top of the container. Now the bags are ready to be filled.
    • Have the filling made by the time the shells are chilled and set.
  • Oven:

    Preheat to 330F and when it reaches 330F, drop the setting to 315F

    Note: This is what works for my oven. You may do ok at 325F the whole time. Each oven is different and the nuances matter with macarons.

    My oven- Leave it in at 330F for 1 minute then drop to 315.

    Bake for another 10-11 minutes.

  • Hot Sugar Syrup

    Granulated Sugar 250g

    Boiling Water 125g

  • Italian Meringue

    Egg Whites 110g (3-4 large eggs)(or 9 strained)

    Cream of Tartar 1 tsp 

    Confectioner’s Sugar 6 tbsp

    Vanilla Extract 2 tsp

    Hot Sugar Syrup

    *Corn Starch 1 tsp (if you need more thickening

  • Macaron Batter

    Almond flour 220g (2.29 cups)

    Confectioner’s Sugar 220g 1.72 ( ~ 1 3/4) Cup

  • Hot Sugar Syrup

    Note: The ratio of water to sugar for syrup is 2:1

    This process should take about 10-15 minutes.

    STEP 1:  Put the boiling water and the granulated sugar in the melting pot on the stove. 

    STEP 2:  Melt the sugar in the water on medium low, stirring to dissolve the sugar thoroughly in the water.

    STEP 3:  Cook the mixture on medium without stirring, 

    STEP 4:  Let it start bubbling, then Increase to medium-high and bring to a boil  - no stirring.

    STEP 5:  When it reaches a full boil, reduce the heat to medium low.

    STEP 6:  Let it simmer to cook out water and it thicken

    STEP 7:  When it is getting a little thick, increase the heat to medium-high to bring it up to temperature.

    STEP 8:  When it reaches 230F start whipping the egg whites for the meringue

    STEP 9:  When it reaches 245F drizzle the hot syrup slowly into the meringue while whisking on medium low - you don’t want it to splatter.

    Tip: You want to time this to coincide with the meringue readiness.

  • Italian Meringue

    This process should take about 10-15 minutes.

    STEP 1:  Boil water on the stove using a double boiler or a pot and a mixing bowl

    STEP 2:  Warm mixing bowl and whisks in oven 1 min or less to take the chill off

    STEP 3:  Place room temperature egg whites in mixing bowl

    STEP 4:  Place mixing bowl over double boiler (or pot)

    STEP 5:  Whisk egg whites slowly to moderately at first until it starts to develop some very small frothy bubbles.

    STEP 6:  Whisk in the cream of tartar and whisk more vigorously to make more froth and then start to increase volume

    STEP 7:  Whisk in the confectioner’s sugar a bit at a time vigorously

    STEP 8:  When it is getting volume, transfer the mixing bowl to the stand mixer and whisk on medium (about 6 on a Kitchen Aid mixer)

    STEP 9:  Increase to medium high (about an 8 on a Kitchen Aid mixer) as the meringue thickens

    STEP 10:  Drop the speed to low while you wait on the syrup if it is not quite ready. You really want the syrup to be ready now.

    STEP 11:  Continue to whip to strong soft peak then slowly drizzle in the hot syrup with the mixer on level 6-8.(You don’t want splatter)

    STEP 12:  Occasionally scrape sides, bottom, and tap meringue out of whisk.

    STEP 13:  Whisk to a firm peak (like a ball in the whisk with a space needle sticking up.

    Food Coloring:

    If you want to color your macaron shells now add the food coloring at the end as you are almost perfect firm peak. Use GEL only. (See "Decorating")

  • Macaron Batter

    The process of folding the dry and wet ingredients together to make the macaron batter is called macaronage. Your manual technique makes all the difference here.

    STEP 1:  INCORPORATE. Sift a small portion of dry ingredients over the meringue and fold into the meringue with a large spatula. Sift and fold a portion at a time until you have incorporated all of the dry ingredients into the meringue. Sift in at least 4-8 portions (more for a larger size batch). 

    NOTE: Fold- Do not mix or stir, and do not mash (as shown in some recipe videos) - you don’t want to express almond oil into the mixture.

    STEP 2:  FOLDING & RIBBONING. Once all ingredients are incorporated continue folding until you have a slow but flowing ribbon of batter when you lift your spatula - like honey. When it starts to ribbon, we are almost ready.  Just a little more to get the ribbon to flow smoothly - not too much!  Just loosen it a little, but not so loose it falls or runs.  (See "Macaronage")

Pipe the macaron shells

Piping

Use a large piping bag with a simple round 0.25″ or 0.5″ piping tip (Wilton #12 is ¼”) 

With piping bags ready in cups, you can pur the batter from a bowl or ladle it in. Twist the top of the bag and tie it. I use silicone bag ties.Pipe immediately.

STEP 1: Pipe rounds 1 ½  to 2” diameter. A macaron mat with circles is helpful for getting the size and spacing right.

STEP 2: After filling the mat with piped macarons, wave and tap the mat on diagonals to tap out any bubbles. If there are any tiny bubbles remaining, prick them with a pin or a toothpick and tap again.

Button label

Drying Macaron Shells

Drying

Let the round set for 30+ minutes until dry. They are dry enough and ready when you can lightly run a finger across the top of one and your finger glides across, smooth and dry with no damage to the macaron shell. 

Drying the Macaron Shells

Rule of Thumb: Let the baking trays of piped macaron shells set on the countertop for 30 minutes.

Run a finger lightly across them to see if they are dry. You can see that the shiny wet macaron takes on a matte finish. Don’t try touching it until you see the matte finish.

If your macaron shells are not dry in 30 minutes, it can sometimes take longer - usually 45 is enough.

If your macaron shells are not drying, try my technique below for humid environments.

Humid Environments

If you are in a crazy humid, hot, wet environment like me, such that even indoors you battle humidity - this is what I do and it works for me:

Put the baking tray of piped macaron shells in the oven for exactly 1 minute.

Remove the tray of macaron shells from the oven and let it set on the countertop for 30 minutes.

Button label

Baking Macaron Shells

Baking

STEP 1: With oven preheated to 325F, Place the macaron baking tray into the oven directly in the center of the middle rack

STEP 2: Reduce heat to 310F and bake  for 12 to 18 minutes.

You must keep watch on them. Do not open the oven door until you think it is done. When you see it rise on the edges (feet) and dome on top, it should be done.

STEP 3: when you think it is done you can open the oven and give the baking sheet a nudge and see if they jiggle. If there is no jiggling, remove the baking tray from the oven. If it is not done let it stay just a little longer. Keep an eye on it. You don’t want it to start taking on any color.

Tip: Place an empty baking sheet on the oven rack above the macaron shells to protect them from browning

Notes:

You must keep a constant eye on them - but do NOT open the door.

You must not let them start to get even a little tanned on top, edge or bottom.

If all has gone well up to this point you should see the edges rise (feet)- not spreading.

Button label

Caption

Cool Down

Remove from Oven and Set on Countertop to Cool

Allow the shells to cool completely before touching them. Then you can remove them from the mat. I prefer to leave them on the mats on the baking sheets and just put those in the refrigerator before removing the macaron shells from the mats.

STEP 1: Set the baking trays of macaron shells on the countertop (on baking racks preferably) and let them cool for at least 30 minutes. 

STEP 2: When the macaron shells are at room temperature, cover them with plastic wrap (not touching) and refrigerate. 

If you intend to fill them immediately, refrigerate for 1-2 hours. Otherwise let them set up in the refrigerator  for 8 hours or overnight. You can fill them immediately, but I have found they do better if set covered in the refrigerator overnight. You will find them less likely to damage when handling to fill if you do this.

-

Button label

Make the Filling

Filling

Step 1: Make the Filling

While the macaron shells are setting, prepare the fillings. Depending on the filling you may want to pipe it freshly made or you may want to let it chill or set for additional firmness. I like buttercreams to firm up a little in the refrigerator before piping. Curds are good to pipe as soon as they cool to room temperature. You just want it loose enough to pipe but firm enough not to squish when you place the second macaron shell on it. 

You’ll find my favorite fillings linked in this recipe under "Pairings".

Step 2: Prepare the Macaron Shells for Filling

1: Lay out a clean pastry mat and piping tools.

2: Sort the macarons according to size. We try to make them all the same size but when doing this by hand nothing is perfect. (maybe if I pipe using a laboratory pipette!) So, that up pairs of shells that fit together nicely and remove any that may have turned out a little wonky.

3:  (Optional) Brush some syrup or condensed cream lightly on the insides (bottoms). Very lightly - not wet. Let it soak in and get tacky or dry before filling. This is an optional step, but it helps seal the surface.

4: Place the pairs together side-by-side, bottom side up.

Step 3: Fill the Macarons

Put the filling in a piping bag and pipe a dollop in the center of one shell in each pair. Put the paired shells together sandwiching the filling between.

Step 4: Set the Macarons

Put the macarons on baking trays, cover with plastic wrap, and return to the refrigerator. Let them rest a few hours until the filling firms up and the macaron shells are well adhered to the fillings.

Button label

Keeping Macarons

Serving & Storing

Serve:

Place the macarons on serving trays or in gift boxes and enjoy!

Storing: Macarons are best consumed fresh, but you can freeze them in a airtight container for up to 3 months. Thaw frozen macarons in the refrigerator for a few hours.

Button label

Pairings

Macarons get their flavor from the filling so this gives you a lot of versatility to create flavors and colors to use for many different occasions and palates.

Pair the flavor of the macarons with the theme of an event or with the cuisine.
Vanilla creme macarons are a universal favorite that go with anything.
If you are serving with desserts of a choclate, mocha, caramel and creme palate, you can do the same with your macarons,

For spring and summer and holidays like St. Patrick's Day and Mardi Gras I like zesty, fruity fillings. Think citrus curds or preserves - also a favorite anytime.

Festive berry macarons are delightful for birthdays and anniversaries. Make a berry curd or preserve. These are also a favorite of most people.

You can use any flavor buttercream frosting or meringue such as butter pecan, mocha, hazelnut, mint, mango, coconut, raspberry.

Ganache makes a nice macaron filling too: white chocolate, white chocolate raspberry, white chocolate mint, peppermint ganache made with Hershey's white chocolate peppermint chips. Dark Chocolate, Milk Chocolate or Mocha.

Button label
  • Buttercreams

    French Buttercream

    Ermine Frosting

    Cream Cheese Frosting

    (Can add chocolates or fruit flavors and mint)

  • Icings

    Swiss-Italian Meringue Icing

    Royal Icing

    Swiss-Italian meringue

    White Chocolate Icing Glaze

  • Ganache

    Chocolate Ganache

    White Chocolate Ganache

    (Here we add flavors like caramel, hazelnut, irish creme, mocha and mint)

  • Curds

    Citrus

    Berries

  • Preserves

    Preserves

    Jams

  • Deorating

    Food Coloring:

    Macarons get all color from the meringue, so if you want colored macaron shells, add gel color to the meringue (not the batter.

    ONE COLOR. If you want the whole batch one color you can add a few drops during macaronage. The color will be lighter after cooking than what you see in the batter.

    TWO COLOR. If you want a streaked or two tone macaron shell, put one color batter in one side of the bag and another color in the other side

    ASSORTMENT. If you want macarons in a variety of colors put batter in a separate bowl for each color and mix in a few drops. You will need a piping bag and tip for each color.


    While macarons are delightful as they are, you can add some more fun with icing, sprinkles, and sparkles. You can put polka dots on them with drops of different colored batter on top - white drops on color or colored drops on white, or yellow drops on pink. 

    You can pipe initials on top in batter. Great for a birthday. You can even add a bit of whipped creme or meringue to the inside filling or on top of the macaron.

    A touch of whipped cream or meringue or a buttercream or icing on top makes it easy to decorate macrons with sprinkles, pearls, glitter or colored sugar crystals. 

    You need to consider the weight of your decoration before you add it. Decorating with colored batter, of course you add it just after piping. Very little sparkles and sprinkles can be added to wet batter while the shells are drying. I have tried candy pearls and although light weight, they crushed a freshly baked macaron shell and sunk. If they cool too much before you put these on, they won’t stay on top. Best to stick with much lighter decorations.

    Icing is a good choice because it is light and you can add it when the baked macaron shells are fully set and filled.

  • Drying Egg Whites

    Here are some methods for drying egg whites. 

    1. Aging Egg Whites in the Refrigerator

    Age egg whites in refrigerator 2 days in ceramic dish covered with plastic. Poke some small holes in the plastic with a toothpick. When you are ready to use, remove the egg whites from the refrigerator and set the bowl on the countertop for 1 hour prior to using.(not more than 2 hours)

    1. Dry Egg Whites on the Countertop

    Set egg whites in an open bowl on the countertop at room temperature for 2 hours.

  • Wipe Down Bowls & Utensils

    Egg whites will not perform well if the conditions are not. In order to make a good meringue they need a warm environment - and dry. You do not want any oils - not even natures oil from your hands. This is made more difficult to achieve due to pots of boiling water. For these reasons we take some extra measures to ensure a good turn out to our meringue.

    1. Wash your hands thoroughly with dish detergent - even if they are clean and dry them well with a dry towel, not even slightly damp. 
    2. Rub down your hands and all bowls and utensils with either vinegar or strong alcohol. This will get rid of any oil or moisture that may be imperceptible to us, but not to the egg whites.

  • Warm Bowls & Utensils

    Warm the mixing bowls for the egg whites (1 regular & 1 stand mixer bowl) and the two whisks in the oven - only about 30 seconds before use to remove the chill.

    Remember you are putting moisture into the air, so help the egg whites along with a very dry bowl and utensil.

    You don’t want them really warm- just a smidge. You should be able to hold the warmed bowl snuggly in your hands and it feel cozy and comforting warm, like a mildly warm mug of hot tea - not so hot that it is uncomfortable or you cannot hold onto it.

  • Macaronage

    Macaronage is the process of folding the meringue and sugar/nut mixture together to make the macaron batter. This is another crucial technique to master. How you use your hands to fold with the spatula can make or break your batter at this point.

    You want to be gentle, but not overboard - you will want to let some of the air out of the meringue as you fold otherwise you have too many air-bubbles. You want to retain a lot of air so you have a nice, light, risen macaron shell. 

    When folding the objective is to incorporate all the dry ingredients so there are no piece of unmixed dry anywhere. You tend to not want to handle the batter anymore than you need to accomplish this. On the other hand you need to fold the batter until if flows smoothly. So, if you need to fold more, do it.

    They key is constantly testing the smoothness, thickness, and flow of the batter as you fold. Do the ribbon test over and over as you work.

    The technique itself: Use a large flexible silicone spatula. 

    1. Run the spatula around the edge of the mixing bowl, turn and cut through the middle of the batter with the edge of the spatula, to the wall of the bowl and then go round again and continue this.
    2. Run the spatula around the edge of the mixing bowl and when the spatula is on the far side, scoop it under the batter scraping the bottom of the bowl as you bring the spatula toward you and bring it up the side of the bowl near you, up and over, folding batter over batter as the spatula goes over the top and meets the far side of the bowl for another swoop. 

    Alternate these two folding methods to get a well incorporated batter that still has plenty of aeration.

    Ribbon Testing

    Fold until smooth and runs in thick, unbroken ribbons off the spatula. You should be able to draw a figure 8 with the ribbon without it breaking and it should stay on the surface of the batter 10-30 seconds - no more, no less.

    You need to fold a little and test the ribbon until you get the right consistency. If the batter is to thick you will get nipples on your shells. If the batter is too loose it will spread too much and flatten.

  • Piping Techniques

    With the right hand on top secure and the bag.  

    With the left hand on the lower-middle  half of the bag to control the tip - Do not hold the tip or just above the tip!

    Hold the tip steady about ¼ inch above the matt. 

    Hold the bag perpendicular (no slant) 

    You should not have to move the tip at all, not up or down or side to side or around - be still. 

    Pipe rounds 1 ¼ to 1 ½ diameter. Squeeze only to the edge of the small circle. If not using mats with circles, do not pipe the full desired diameter, because it will spread.

    Finish off and disconnect with a little flourish of the tip (a quick, tight swish in a teardrop shape right to left. Keep the top level and close to the surfaced- don’t swish upward. That will create a nipple.

    Any peaks should disappear in a minute or two.

    If peaks remain visible, the batter is too thick/firm.

    If the batter is too thin, the rounds will continue to spread.

    Macaron shells must have time to set and dry after piping. This phase is crucial. The drying time and the lengths you must go to depends on the temperature and humidity in your environment.

  • Macaron Tios

    Pair text with an image to focus on your chosen product, collection, or blog post. Add details on availability, style, or even provide a review.

  • Macaron Troubleshooting

    1. Wrinkly shells - oven too low
    2. Shells crisp - over baked
    3. Bottoms not solid or sticky - under baked
    4. Not round - piping/parchment
    5. Bumpy texture - under-mixed batter
    6. Nipples - under-mixed batter
    7. Flat shells - overmixed batter
    8. Concave shells - meringue too soft, better too wet
    9. Meringue grainy - over beaten
    10. Brown Bottoms - brush mixture of syrup or condensed milk on the bottoms
    11. Make sure meringue is shiny and smooth to make nice shells.
    12. Macaron shells are changing color while baking - The oven is too hot. Open the door and lower the temp. Let the temperature drop to the desired level, then close the oven door.
    13. Shells want to stick to the mat - The egg whites were too moist. They needed to be aged or dried a little more. It could possibly be that they needed to bake just a little bit longer - just 1-2 minutes.